<?xml version="1.0" encoding="utf-8"?><feed xmlns="http://www.w3.org/2005/Atom" ><generator uri="https://jekyllrb.com/" version="3.10.0">Jekyll</generator><link href="https://minuitfranck.com/feed.xml" rel="self" type="application/atom+xml" /><link href="https://minuitfranck.com/" rel="alternate" type="text/html" /><updated>2026-05-24T19:22:33+00:00</updated><id>https://minuitfranck.com/feed.xml</id><title type="html">minuitfranck</title><subtitle>A newbie solderer rediscovering the Game Boys of my childhood. Here are some of my mistakes, mods, and memories.</subtitle><author><name>minuitfranck</name></author><entry><title type="html">Picking up the solder iron</title><link href="https://minuitfranck.com/journal/2026/05/13/about-gbagain.html" rel="alternate" type="text/html" title="Picking up the solder iron" /><published>2026-05-13T00:00:00+00:00</published><updated>2026-05-13T00:00:00+00:00</updated><id>https://minuitfranck.com/journal/2026/05/13/about-gbagain</id><content type="html" xml:base="https://minuitfranck.com/journal/2026/05/13/about-gbagain.html"><![CDATA[<p>A lot of enthusiastic and kind people on the internet will lead you to believe that it does not take much to start soldering. You’ll read that all you need to start is a soldering iron and solder which could just run you $20 on Amazon. That, plus a couple of YouTube/TikTok videos, and you’re set! Really appealing, right? They aren’t wrong — but that is just the absolute bare minimum. Don’t be fooled. You will most inevitably screw up the first time and it won’t be pretty. Oh, and you won’t have the stuff to desolder your mistake.</p>

<p>
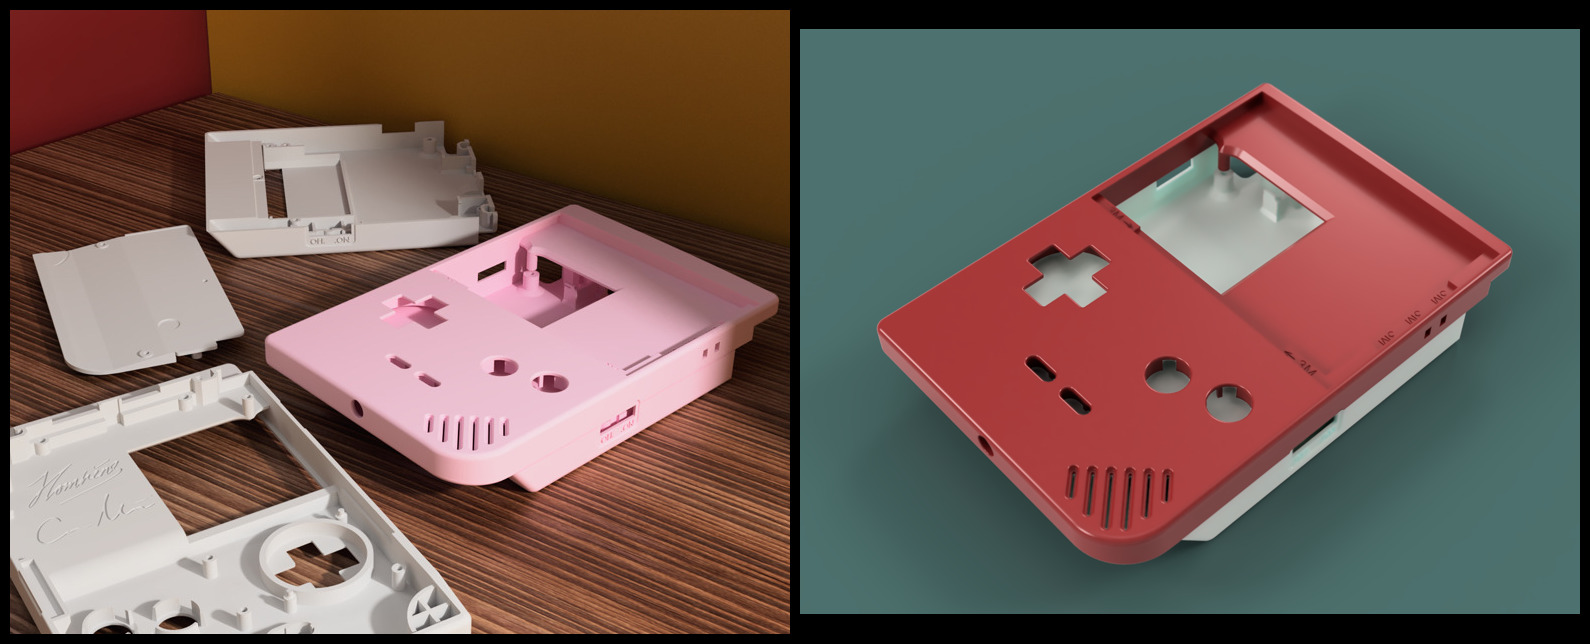
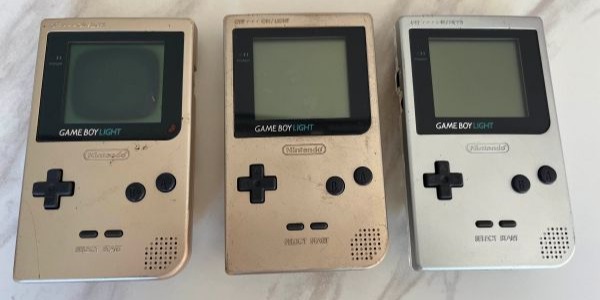
The entry-level stuff like cleaning up old units with IPA and swapping shells and buttons is very approachable, followed by maybe blobbing on one or two blobs of solder to swap out screens and speakers. But to get to the real interesting stuff you have to be able to do much more advanced soldering (and desoldering), and the modding community will not sugar-coat this. As open as the community is with all the wealth of information that is available, there are big warning signs on open-source GitHub repos and even printed on physical hardware mods that are distributed to caution all those who dare try.</p>

<p>The much more interesting mods are those that involve being able to attach or remove components from motherboards, or really salvaging the truly junk and damaged motherboards. The full swaps or restorations of very corroded boards into both gorgeously restored and functional machines that can run for another decade is a sight to see. Or at least, that would be the intent. The most extensive reworks involve transferring donor components from old units to new motherboards that have improved upon circuitry.</p>

<p>This involves much more advanced desoldering and transferring onto new boards and soldering. Not to mention some of these components and pins are so incredibly tiny that they require a microscope to feel confident about the quality of your work.</p>

<p>Initially I browsed around and found some fairly affordable little kits that you can purchase to practice soldering different types of components onto printed circuit boards (PCBs). These components included:</p>

<ul>
  <li><strong>Through-hole parts</strong> — larger capacitors, resistors, ports.
    <ul>
      <li>Technique: classic beginner’s soldering — heat up a single pad at a time and feed the solder.</li>
    </ul>
  </li>
  <li><strong>IC chips</strong> — CPU/RAM chips with rows of pins on two or four sides.
    <ul>
      <li>Technique: drag soldering.</li>
    </ul>
  </li>
  <li><strong>SMD components</strong> — e.g. 0603-size package resistors, capacitors, etc.
    <ul>
      <li>Technique: solder iron, hot air, solder paste, hot plate.</li>
    </ul>
  </li>
  <li><strong>QFN packages</strong> — chips with both a flat underside and pins on the sides that require soldering.
    <ul>
      <li>Technique: hot air, solder paste, hot plate.</li>
    </ul>
  </li>
</ul>

<p>These kits looked like a great resource, but I found that the best thing was actually finding a few old printers left out as e-waste. I was fortunate enough that I found some waiting to be picked up by waste management and took them home and just went Office Space on them.</p>

<p><img src="https://cdn.hashnode.com/res/hashnode/image/upload/v1747894618011/8ac1321b-b9e4-4f2f-9b98-5cfb44bca126.jpeg?auto=compress,format&amp;format=webp&amp;q=75" alt="" /></p>

<p>These old printers would yield about 2-3 really good boards that had a fair amount and variety of components for me to practice desoldering — which arguably can be an even more challenging task since you don’t want to damage any donor components. (Also, possible free SMDs for later use!) Desoldering usually involves using copper-braided desoldering wick and a solder iron, and/or low-melt solder paste and hot air, to remove components safely without damaging them for transfer. These old parts allowed me to get comfortable with my tools and materials.</p>

<p>
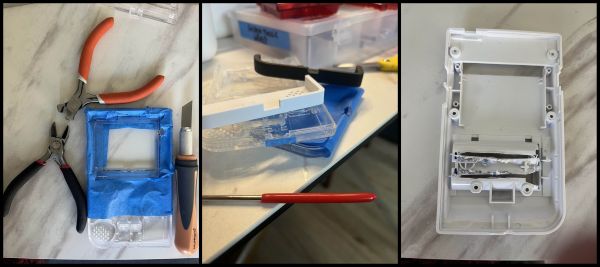
But of course, I’ve still had lots of failures. There were lots of frustrations that I realized — my hot air station is much slower (weaker, lower quality) than those proper ones used in all the instructional videos. Mine is the fan type rather than the piston type. PCBs harvested had components on both sides, were thick and multilayered, very robust with a lot of heat dissipation, and required a lot more time/heat distribution to remove components. This was not ideal for plastic components like FFC connectors (ribbon pin cable). I did not initially have the right tools for picking up chips as they loosened — I only had tweezers and a pry tool that would damage pins. I realized this a lot, and shopped around for the right stuff frequently.</p>

<p>I persisted and managed. I figured out what size nozzle, temperature, and airflow was optimal for my unit, and also used a hot plate when able. I removed components on the underside and placed the board on a hot plate to pre-heat the surface under the chips for better heat distribution from below in addition to the hot air I was applying from above. Bought more tools. A mini suction tool on the chips was really useful. A thin-edge spatula tool on chips with flat sides is very helpful.</p>

<p>
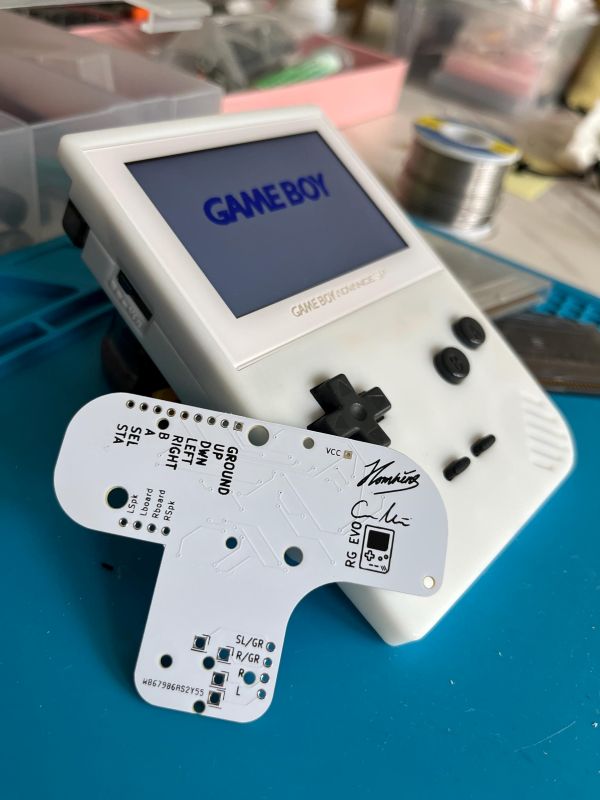
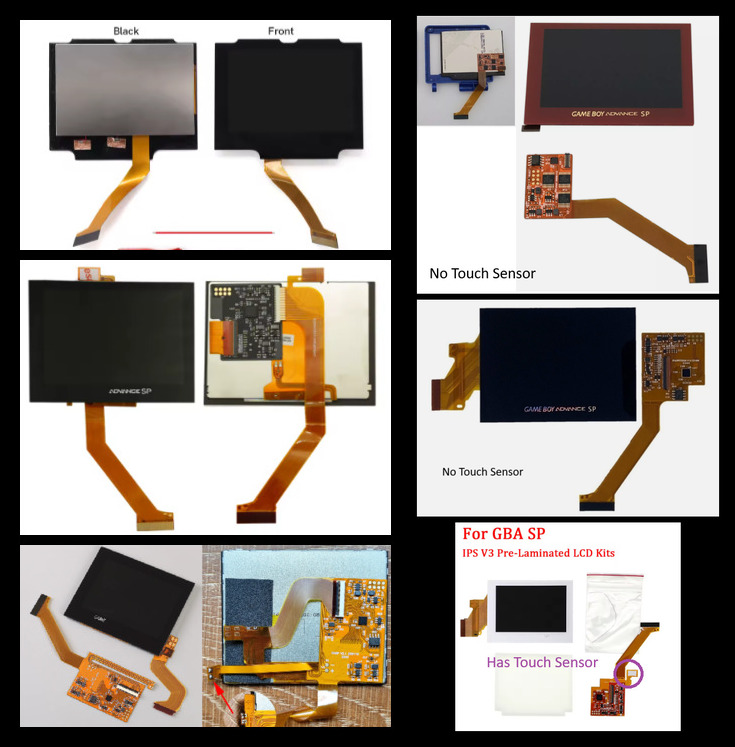
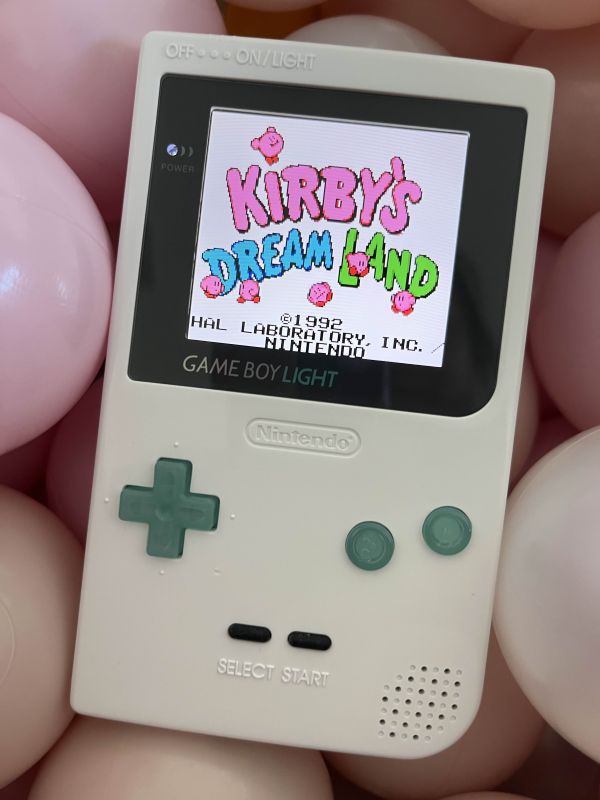
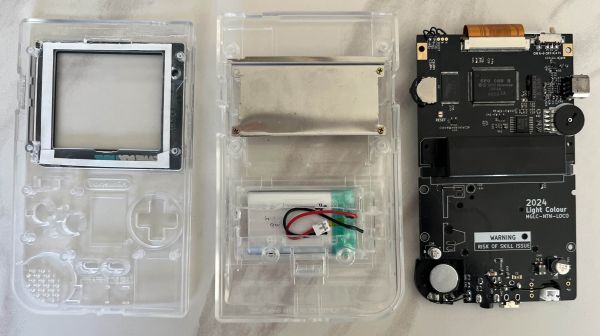
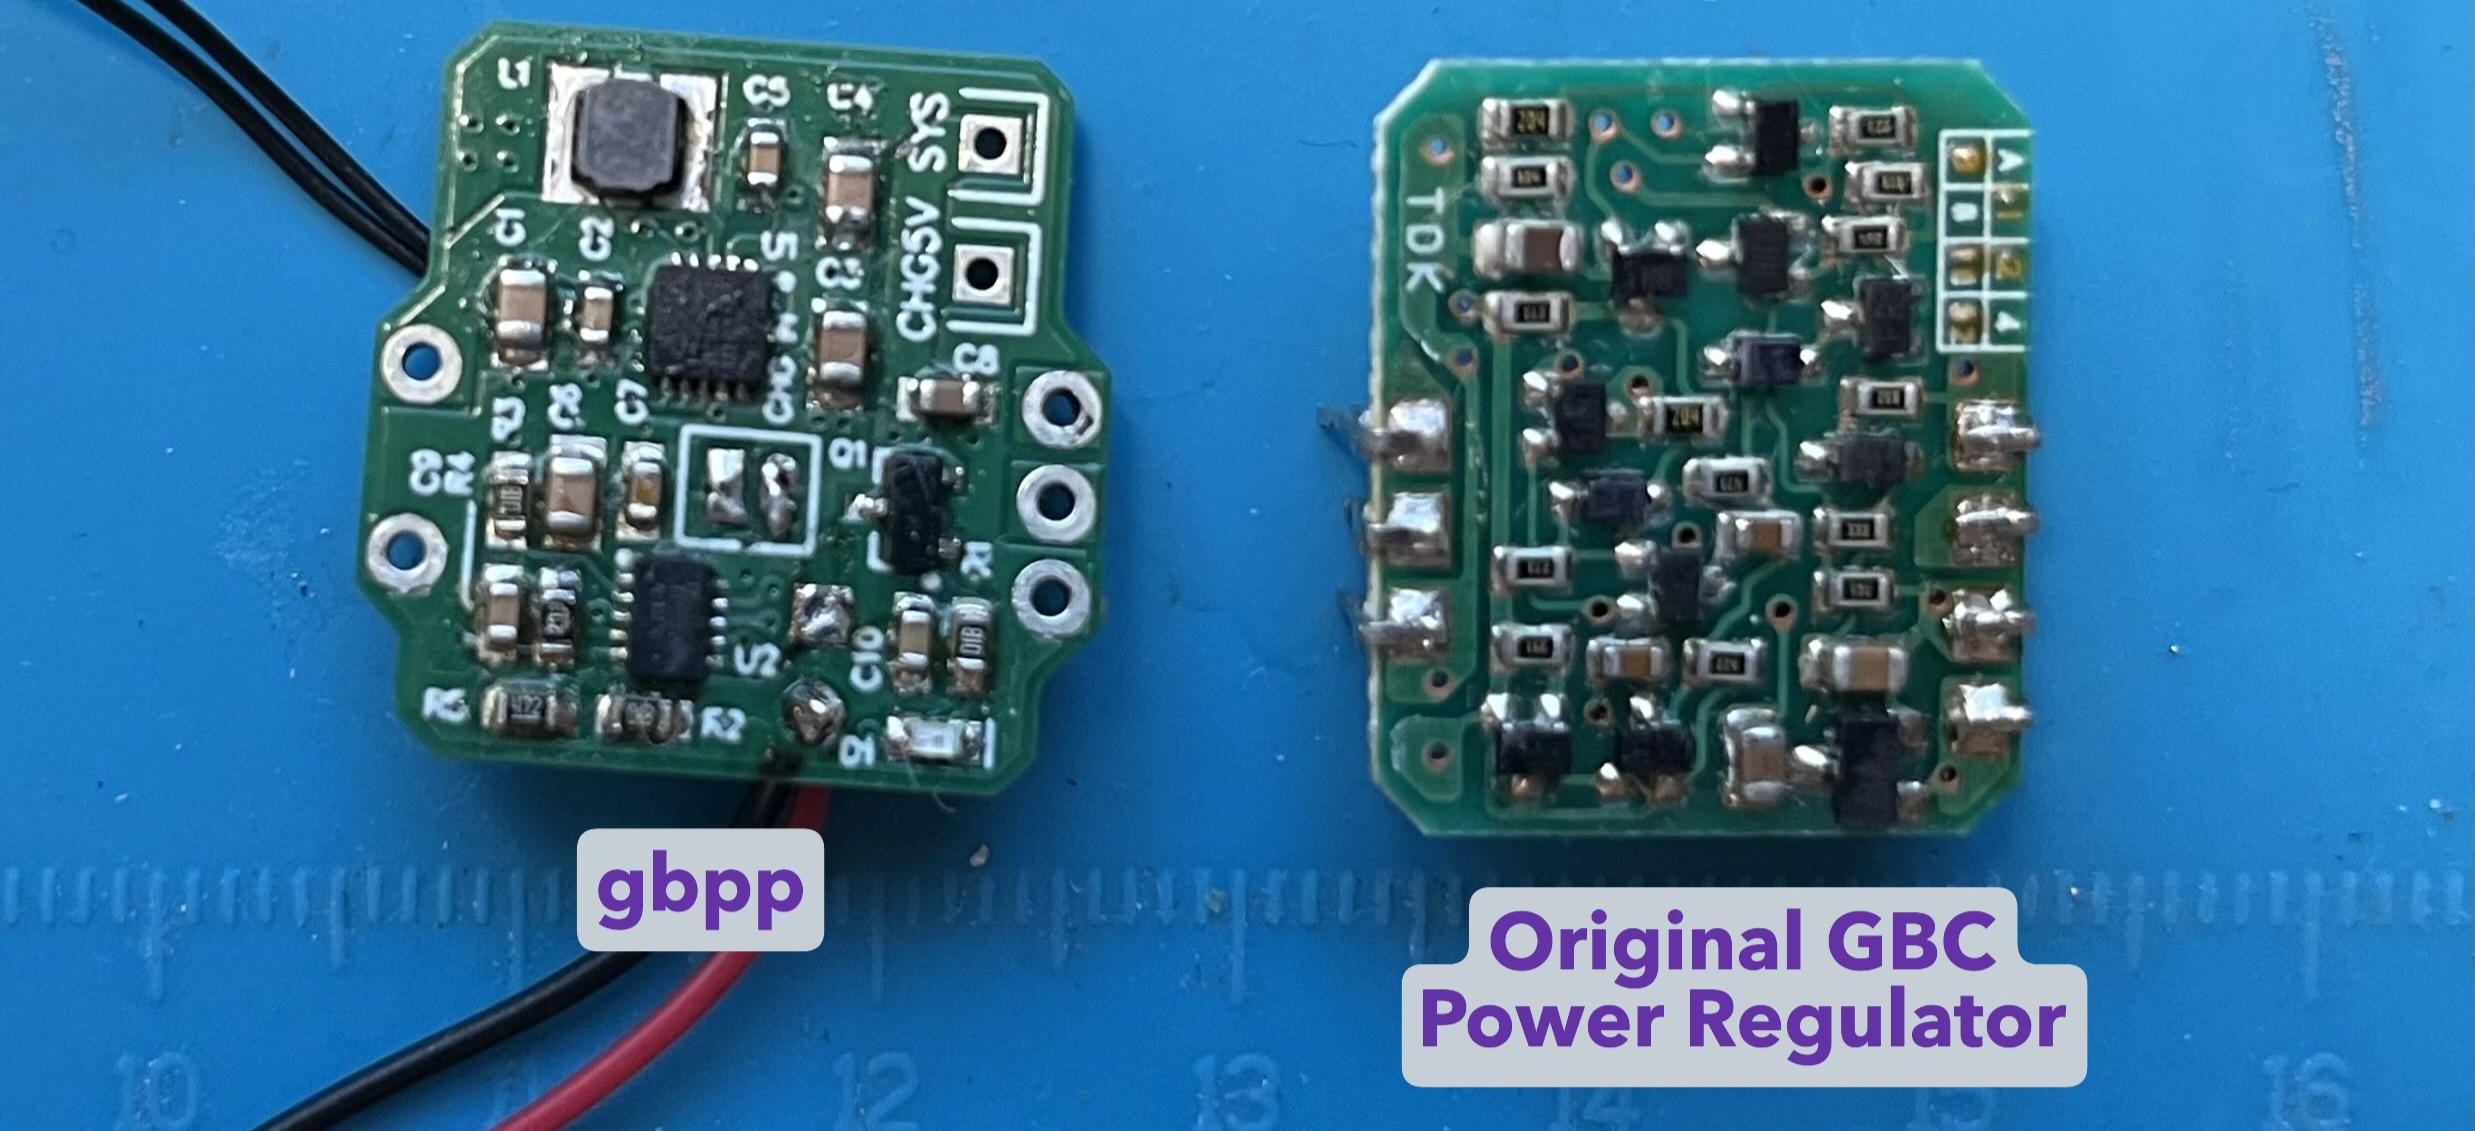
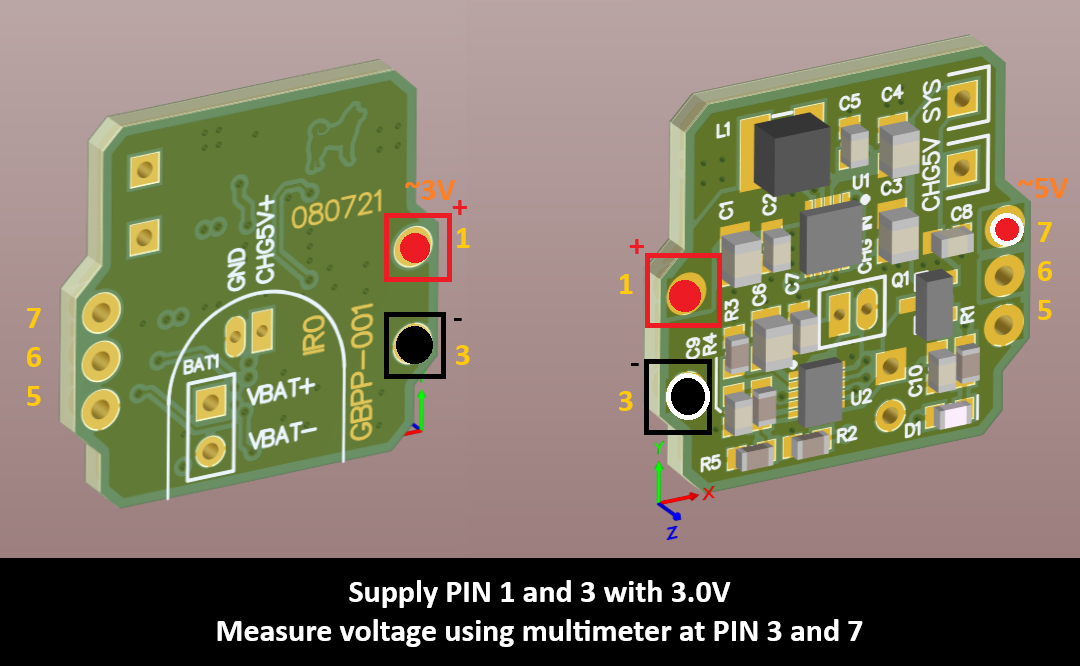
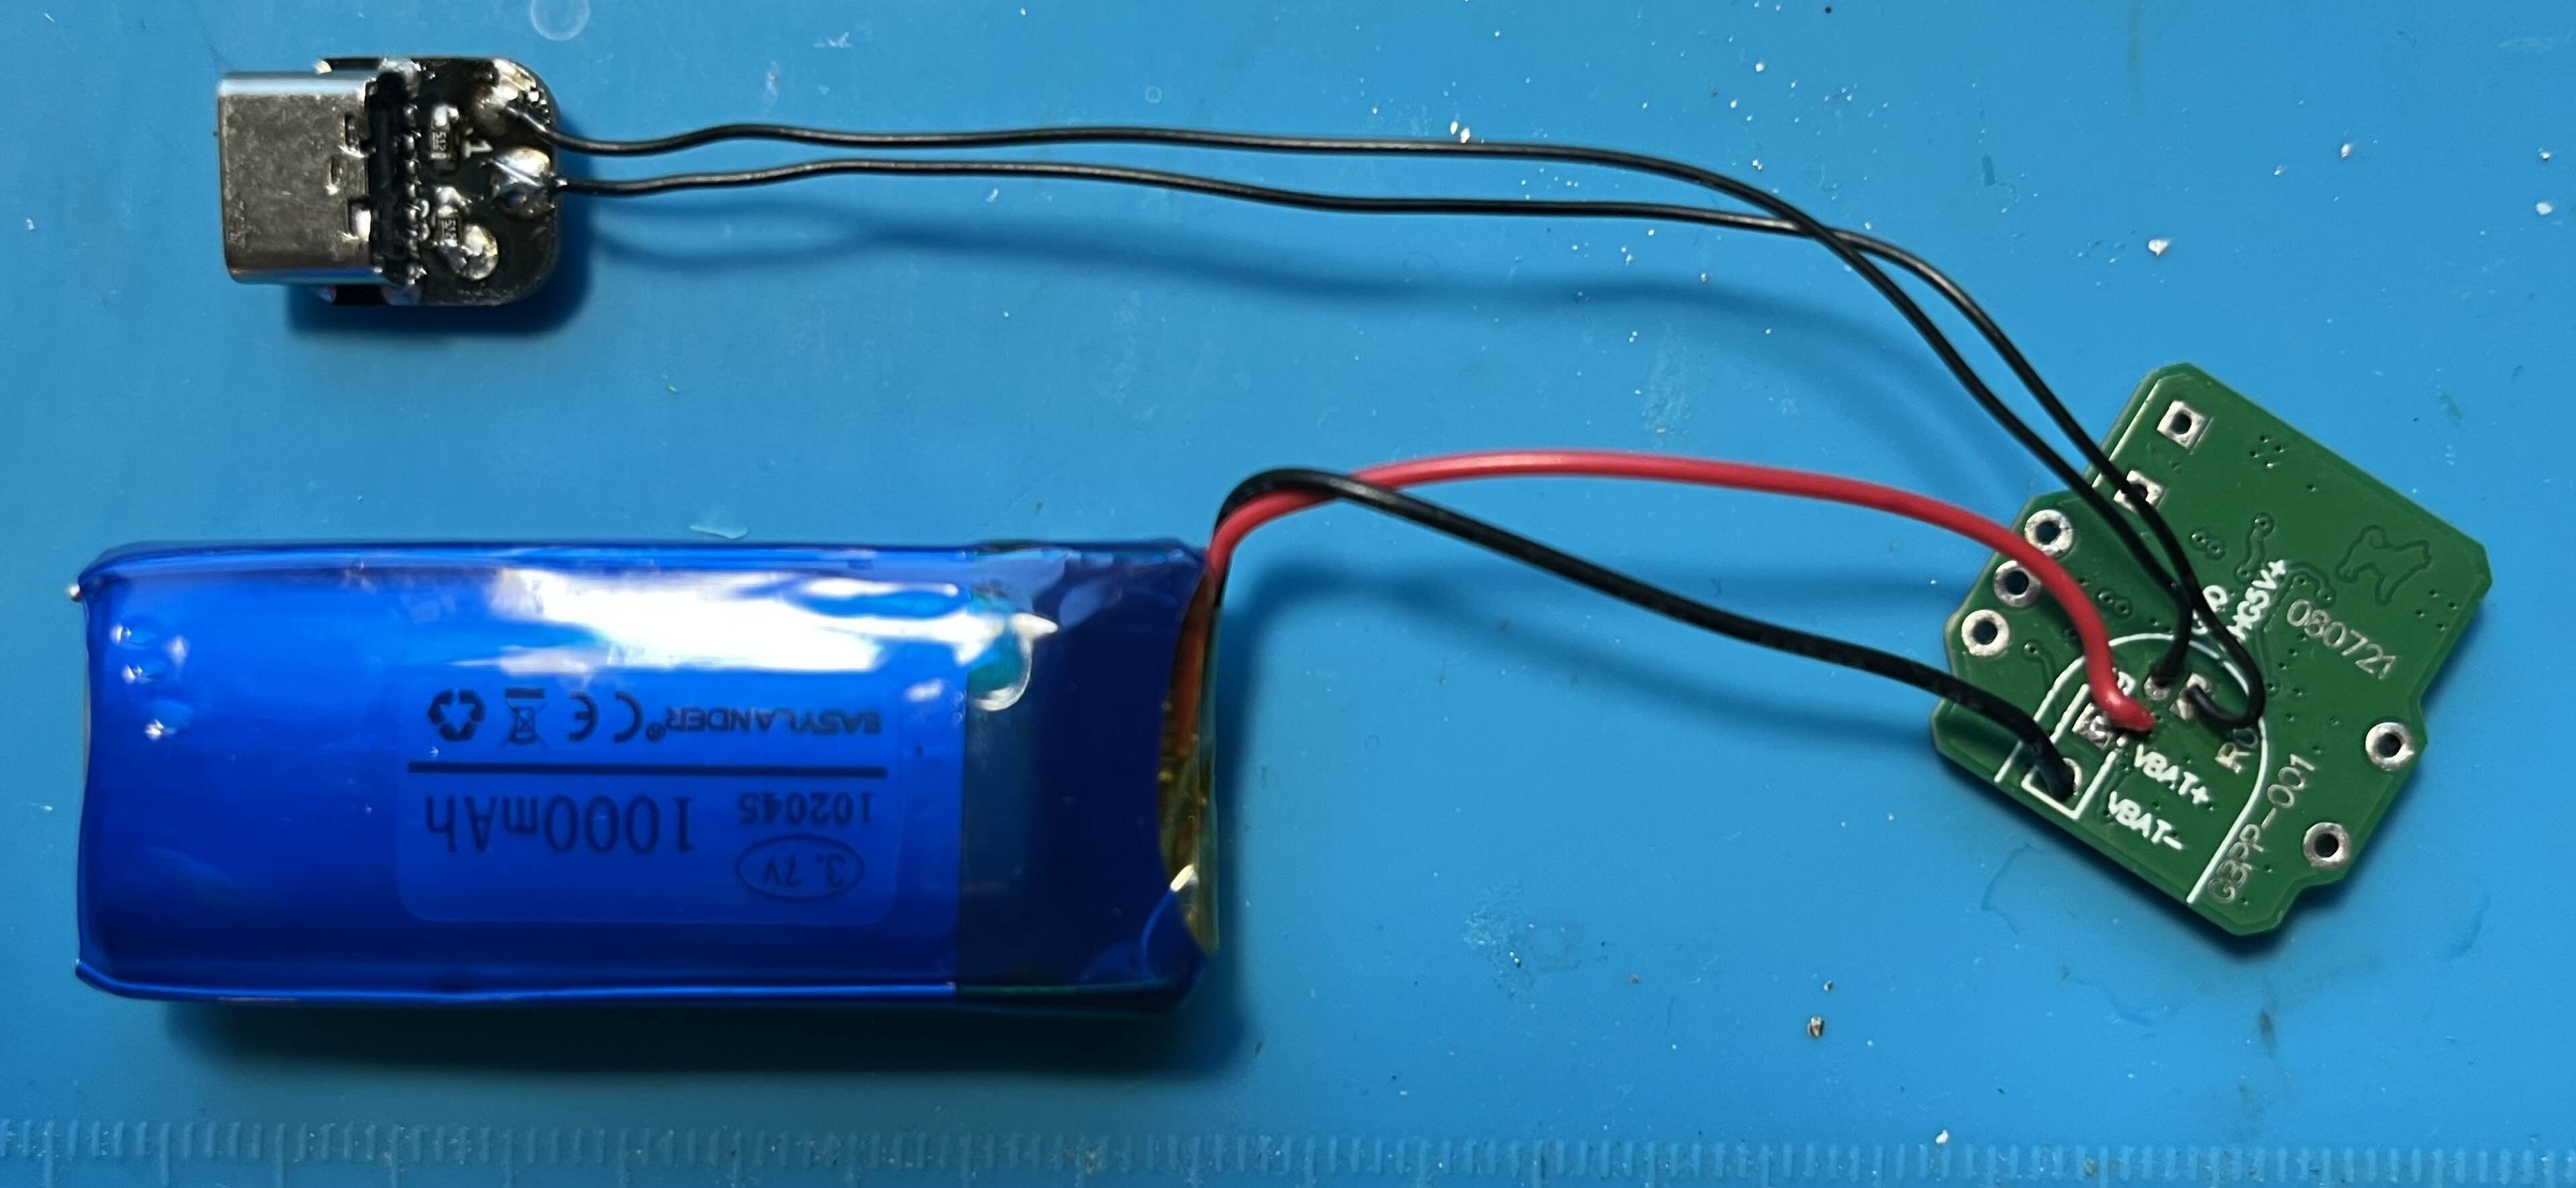
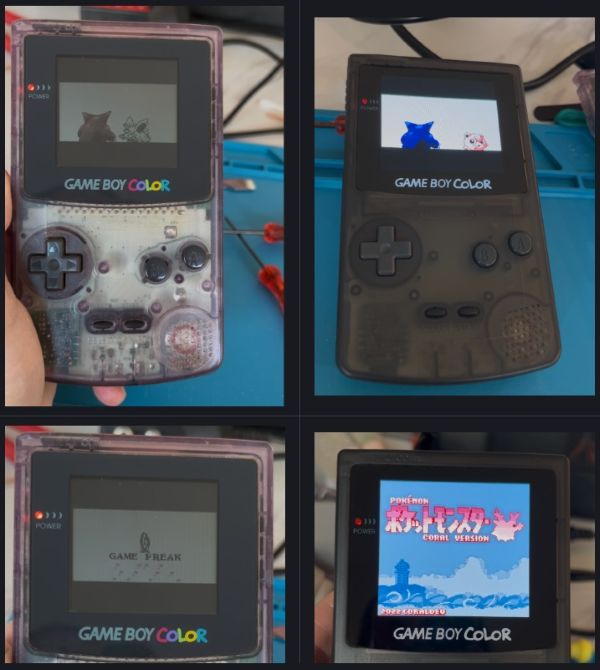
So that’s taking things apart — now to attaching things. The newer IPS screen replacements and flashcarts (cartridges with microSD cards for ROMs/homebrew) are incredibly power-hungry, and in order to better power the units a new power regulator board is needed. BucketMouse, one of the most well-known developers in the scene, has set the expectation that anyone who wants to build his modern Game Boy Pocket Color (which requires micro soldering, desoldering donor parts, and drag soldering components) should first build his <a href="https://github.com/MouseBiteLabs/Pocket-Mouse-Power-Board">power regulator</a> as a litmus test — and also to understand how to test it. His documentation on his projects is also extensive and incredibly helpful.</p>

<p>
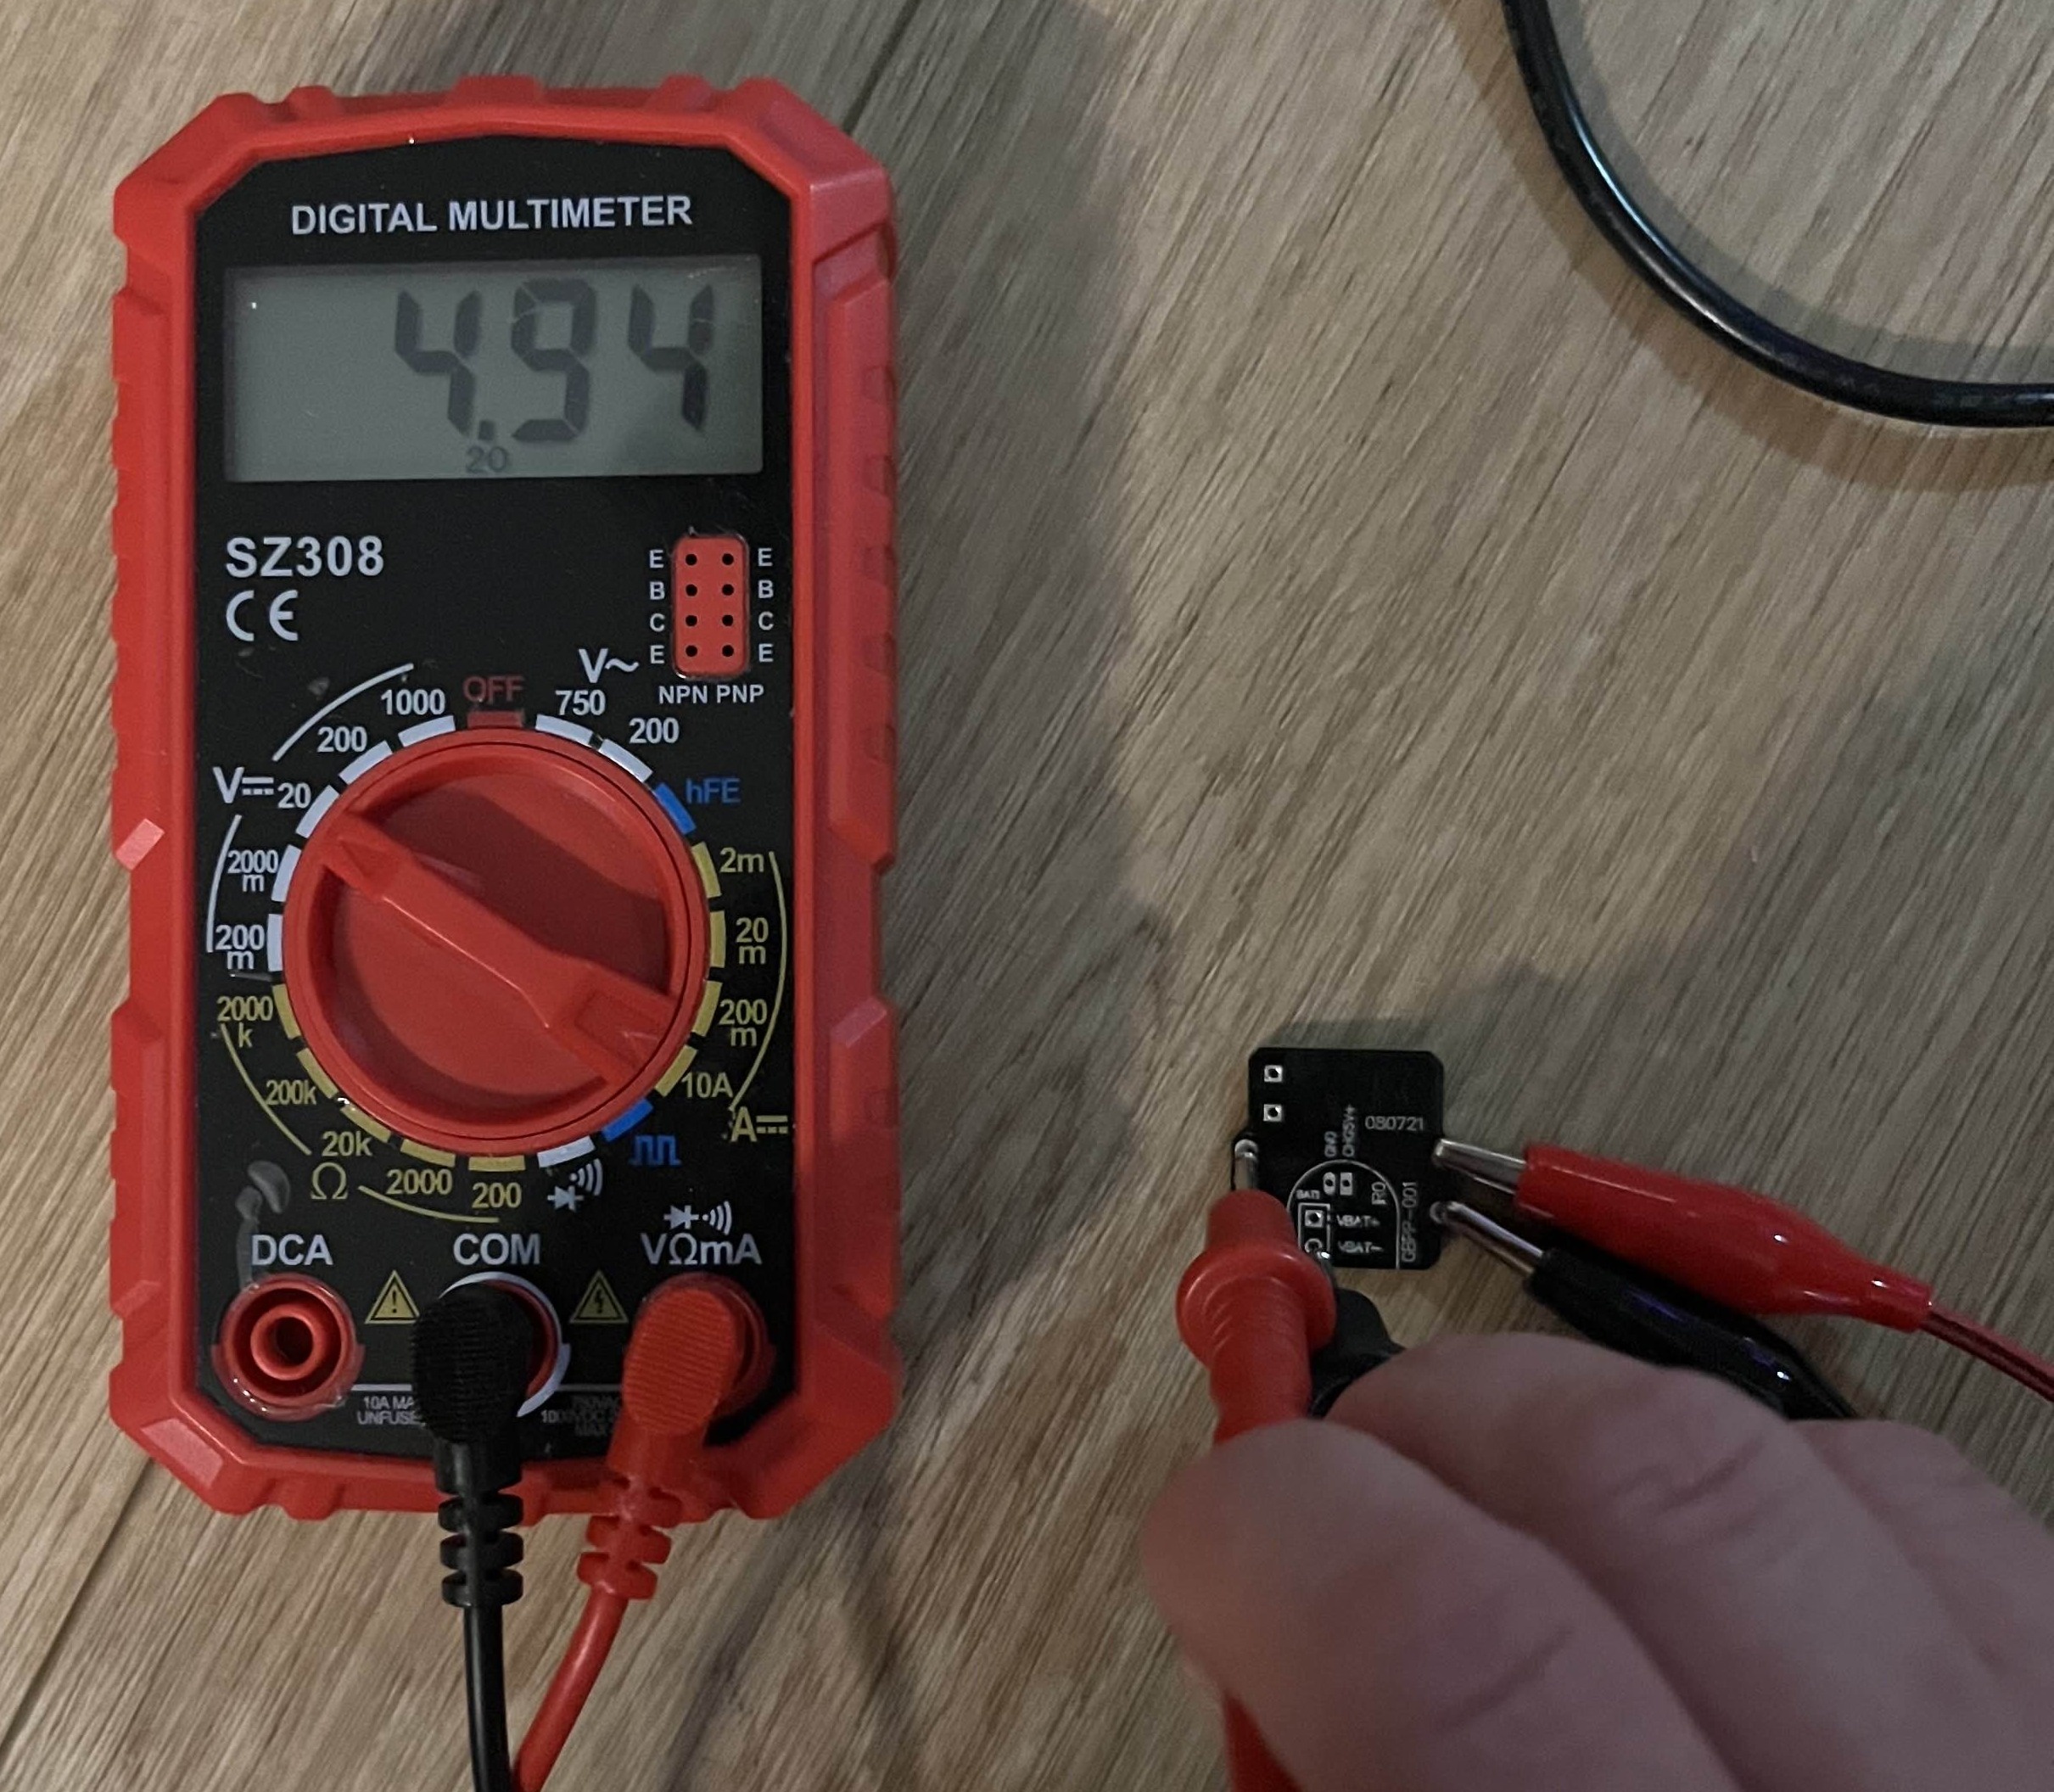
There exist many open-source power regulators. The first one I chose to build was <a href="https://github.com/skimzor/SZ-REG">Skimzor’s SZ regulator</a>. Admittedly because it had a plain front face and the fewest components to source, and I also wanted to try my hand at a QFN package — which is considered a difficult package to solder. As a newcomer to the scene, this was the most rewarding thing for me to build, and exciting to see it display ~5V properly on a multimeter.</p>

<h3 id="tools-ive-been-using-2026">Tools I’ve been using (2026)</h3>

<ul>
  <li>YIHUA 952D+I Intelligent Air Pump Type Rework Station Soldering Station</li>
  <li><a href="https://amazon.com/dp/B0DC5848MP">HANGLIFE 900M Solder Iron Tips</a></li>
  <li><a href="https://s.click.aliexpress.com/e/_oDocO5Y">YIHUA 929D-V Desoldering Iron Electric Sucker (Green Model)</a></li>
  <li><a href="https://s.click.aliexpress.com/e/_c3DA9uXp">Mechanic IX5 Mini Hot Plate</a></li>
  <li><a href="https://s.click.aliexpress.com/e/_c4sEX7Wj">“AMTECH” NC559 RMA223</a></li>
  <li><a href="https://www.aliexpress.us/item/3256806938421690.html">ATTEN AT-B778 Antistatic Manual Vacuum Suction Pen</a></li>
  <li><a href="https://s.click.aliexpress.com/e/_c3nWDMvV">TOMLOV DM9 7” Digital Microscope</a></li>
</ul>

<h3 id="tools-ive-been-using-2025">Tools I’ve been using (2025)</h3>

<ul>
  <li><a href="https://s.click.aliexpress.com/e/_oFw7QMO">JCD 8898Pro Solder Iron / Hot Air Station</a></li>
  <li><a href="https://amazon.com/dp/B0DC5848MP">HANGLIFE 900M Solder Iron Tips</a></li>
  <li><a href="https://s.click.aliexpress.com/e/_oDocO5Y">YIHUA 929D-V Desoldering Iron Electric Sucker (Green Model)</a></li>
  <li><a href="https://s.click.aliexpress.com/e/_c3DA9uXp">Mechanic IX5 Mini Hot Plate</a></li>
  <li><a href="https://s.click.aliexpress.com/e/_ol7Proa">Mechanic M35 Nano Flux Paste</a></li>
  <li><a href="https://www.aliexpress.us/item/3256806938421690.html">ATTEN AT-B778 Antistatic Manual Vacuum Suction Pen</a></li>
</ul>]]></content><author><name>minuitfranck</name></author><category term="Journal" /><category term="game-boy" /><summary type="html"><![CDATA[What soldering really takes once you move past blob-on-a-pad.]]></summary></entry><entry><title type="html">Building the Original MK1 by Joseph Tompkins and retrogamer.evo</title><link href="https://minuitfranck.com/build%20logs/2026/05/13/building-the-original-mk1.html" rel="alternate" type="text/html" title="Building the Original MK1 by Joseph Tompkins and retrogamer.evo" /><published>2026-05-13T00:00:00+00:00</published><updated>2026-05-13T00:00:00+00:00</updated><id>https://minuitfranck.com/build%20logs/2026/05/13/building-the-original-mk1</id><content type="html" xml:base="https://minuitfranck.com/build%20logs/2026/05/13/building-the-original-mk1.html"><![CDATA[<p><img src="/assets/images/posts/building-the-original-mk1/71cec0d4-6ac3-4679-abe7-0573b5102165.jpeg" alt="" /></p>

<p><a href="https://ko-fi.com/i/IV7V3PJ8TO">The Original MK1</a> by the immensely talented Joseph Tompkins is the reimagining of the Gameboy Advance SP from the clamshell format into a hingeless Gameboy Pocket style form factor. I immediately gravitate towards these form factors and the GBA is my favorite out of the entire Gameboy series. I had seen this 3D print early on and wondered about it but had concerns about building a fully 3D printed device since without any part of it supported by a mold-injected cast shell it would be brittle and leave little room for build errors and tinkering. However, reading NatalieTheNerd’s <a href="https://nataliethenerd.com/blogs/news/game-boy-pocket-advance">blog post</a> about her failed attempts at creating a Game Boy Pocket Advance led solidified my interest in building the MK1.</p>

<p>To start–there’s limited to no direct documentation on how to build the MK1 but I suppose if you are a seasoned modder you can do it rather intuitively. (I am not.) I spent a fair amount of time looking<a href="https://www.instagram.com/northbestelectronics/reel/DE_3HyduFHu/"> @northbestelectronic’s</a> <a href="https://www.instagram.com/pcbway/reel/DAc_50JC6JG/">IG posts</a> and used the <a href="https://pcbwayfile.s3.us-west-2.amazonaws.com/web/24/03/14/0037492351105.png">GachaSP’s wiring schematics</a>. What the most outwardly available is <a href="https://ko-fi.com/josephtomkins">Joseph Tompkin’s</a> <a href="https://ko-fi.com/s/db141bfcc0">ko-fi MK0 Files</a> and <a href="https://www.etsy.com/shop/retrogameEVO">Jonas retrogame.evo’s</a> <a href="https://www.pcbway.com/project/shareproject/Gameboy_MK0_button_and_sound_interface_PCB_4ec38783.html">PCBWAY Gameboy MK0 PCB</a> button and sound interface printed circuit board. I also messaged Joseph on his ko-fi for some pointers.</p>

<p><img src="/assets/images/posts/building-the-original-mk1/c9436401-8182-4ad7-8489-ebbbf3419d3f.jpeg" alt="" /></p>

<p>Picture from Joseph Tompkin’s ko-fi, Original MK1 (now renamed “<a href="https://ko-fi.com/s/db141bfcc0">MK0</a>”)</p>

<p>The most important part of this build is sourcing the proper screen. MK1’s front shell has several important factors that determine a very specific screen type. I messaged Joseph and he told me this build was specifically made for a GBASP screen that is no longer made, FunnyPlaying IPS V2. But as of April 2025 this build was still possible using an <a href="https://s.click.aliexpress.com/e/_olArmKR">IPS V3 screen</a> that I found on AliExpress. I also found a few of these floating around on eBay but they are quite rare and the touch sensor variant is ideal for OSD to toggle screen settings.</p>

<p>For the screen to fit into this shell, the screen itself needs to have no protruding edges around the bezels and the ribbon cable and PCB needs to be on the right side (when looking from behind) which is what the original FunnyPlaying IPS V2 was. Many of the updated IPS screens will NOT work. I’ve noticed that most of the newer screens have the ribbons at the bottom of the screen. In my message with Joseph he cautioned that the MK1 would be a complex build with the no longer manufactured parts and that it would need to be updated in the future. And no, I did some measurements, despite the ribbon and PCB on the right side of the screen, the <a href="https://s.click.aliexpress.com/e/_opoLVx9">DSI screen</a> will not work either since the PCB height exceeds the shell’s window. I absolutely loved and enjoyed this build very much and hope to have a chance to build another one of these if I can get another screen that works with this shell.</p>

<p>The design of this device is amazing and everything fits together very well. Perhaps at some point I will re-print and re-build this into a stronger material for better build quality, but for now it feels and plays perfectly well.</p>

<h3 id="gba-sp-screens">GBA SP screens</h3>

<p><img src="/assets/images/posts/building-the-original-mk1/e2753b30-c32a-4ee6-9ec5-aca481713b60.jpeg" alt="" /></p>

<table>
  <thead>
    <tr>
      <th>Will NOT work</th>
      <th>Will work</th>
    </tr>
  </thead>
  <tbody>
    <tr>
      <td>Protruding bezels</td>
      <td>Original FunnyPlaying V2</td>
    </tr>
    <tr>
      <td>Ribbon cable in the wrong place</td>
      <td>High Brightness Laminated IPS “V3?” without touch sensor</td>
    </tr>
    <tr>
      <td>PCB too big for the window</td>
      <td><a href="https://s.click.aliexpress.com/e/_olArmKR">High Brightness Laminated IPS V3</a> with touch sensor (for OSD)</td>
    </tr>
    <tr>
      <td>“IPS V3” does not mean it will work</td>
      <td> </td>
    </tr>
  </tbody>
</table>

<h3 id="build-materials">Build materials</h3>

<ul>
  <li><a href="https://ko-fi.com/s/db141bfcc0">3D Print MK1</a></li>
  <li><a href="https://www.pcbway.com/project/shareproject/Gameboy_MK0_button_and_sound_interface_PCB_4ec38783.html">MK0 Custom Button Board</a></li>
  <li>GBA SP motherboard</li>
  <li>IPS screen that <a href="https://s.click.aliexpress.com/e/_oF8zYo6">fits</a> (see above)</li>
  <li><a href="https://s.click.aliexpress.com/e/_onlMZav">23mm GBC speaker “Louder speaker”</a></li>
  <li><a href="https://s.click.aliexpress.com/e/_ooZKo7P">LiPo battery 603048 3.7V</a></li>
  <li><a href="https://s.click.aliexpress.com/e/_ool3nUl">Double-sided tape</a> — cell phone repair tapes work well</li>
  <li>GBC buttons, triggers, hinges, springs</li>
</ul>

<h3 id="other-materials">Other materials</h3>

<ul>
  <li><a href="https://s.click.aliexpress.com/e/_okiICsa">GBA SP USB-C power/audio mod</a></li>
  <li><a href="https://s.click.aliexpress.com/e/_oEje6fP">M2.0 cross-recessed countersunk-head self-tapping screws</a></li>
  <li><a href="https://s.click.aliexpress.com/e/_opW7apx">30 AWG wire</a></li>
</ul>

<p><a href="https://imgur.com/a/zsusMKH">Imgur build gallery</a></p>]]></content><author><name>minuitfranck</name></author><category term="Build Logs" /><category term="game-boy" /><summary type="html"><![CDATA[Joseph Tompkins' hingeless, Pocket-style reimagining of the GBA SP.]]></summary></entry><entry><title type="html">Early Challenges</title><link href="https://minuitfranck.com/journal/2026/05/13/early-challenges.html" rel="alternate" type="text/html" title="Early Challenges" /><published>2026-05-13T00:00:00+00:00</published><updated>2026-05-13T00:00:00+00:00</updated><id>https://minuitfranck.com/journal/2026/05/13/early-challenges</id><content type="html" xml:base="https://minuitfranck.com/journal/2026/05/13/early-challenges.html"><![CDATA[<p>I will admit I jumped in quickly without any formal didactic attempts to really understand electronics. I did watch some very brief videos to brush up on the basics — they stirred up some memories of Ohm’s law from high school physics — but admittedly I did not spend much time before wanting to move on to more practical applications and just executing mods. And of course there were many times that I felt frustrated since I could not troubleshoot issues, read schematics, or solve problems without searching Google, YouTube, or asking AI bots specific questions hoping for specific answers. The issue was I also was not sure if I was asking the questions properly. Also, don’t depend on your “Google abilities” or AI bots, because they will likely be wrong and lead you astray. A lot.</p>

<p>One of the earliest and most frequent problems I came across was power issues — losing ground, shorts and multiple shorts, GND continuity with VOUT, torn/ripped pads. Tons of head-scratching problems for a newbie like me with no experience. I do as much as I can using a multimeter, comparing between a working unit and my faulty unit. And of course, searching and slowly reading through all the layers and depths of available documentation that this deep community has shared has been helpful too.</p>

<p>These resources and videos below were very helpful, and I refer to them often.</p>

<h3 id="game-boy-resources">Game Boy resources</h3>

<ul>
  <li><strong><a href="https://moddedgameboy.club/">Modded Gameboy Club</a></strong> — super helpful bunch of people; many of the links below come from here.</li>
  <li><strong><a href="https://gbwiki.org/en/other/commonissues">Game Boy Wiki — Common Issues</a></strong></li>
  <li><strong><a href="https://wiki.nataliethenerd.com/docs/category/game-boy/">NatalieTheNerd’s Game Boy Wiki</a></strong> — board scans</li>
  <li><strong><a href="https://github.com/nataliethenerd/CGB_ReverseEngineer">NatalieTheNerd’s CGB reverse schematics</a></strong></li>
  <li><strong><a href="https://github.com/Gekkio/gb-schematics">Gekkio’s Game Boy schematics</a></strong> — DMG, MGB, MGL, AGS-001, SGB</li>
  <li><strong><a href="https://github.com/rorosaurus/gba-sp-headphone-jack">rorosaurus’ GBA SP headphone jack mod list</a></strong></li>
  <li><strong><a href="https://www.reddit.com/r/Gameboy/comments/1akc98u/psa_do_not_replace_aluminum_electrolytic/">BucketMouse’s PSA: keep using aluminum capacitors</a></strong></li>
</ul>

<h3 id="helpful-practical-videos">Helpful practical videos</h3>

<ul>
  <li><strong>olDirdey</strong> — <a href="https://www.youtube.com/watch?v=aFr6DP11mg4&amp;t=35s">Removing GBC cartridge slot safely using a hollow needle</a> (if you fail, <a href="https://funnyplaying.com/products/replacement-cartridge-slot-for-gbc">grab a replacement here</a>)</li>
  <li><strong>RetroSix</strong> — <a href="https://www.youtube.com/watch?v=Mbp_mAcxLUQ&amp;t=1s">GBC power circuit and power regulator schematic</a></li>
  <li><strong>RetroStashRepairs</strong> — <a href="https://www.youtube.com/watch?v=pYa1Ld7IafM">Fix lifted solder pads, broken vias and traces</a></li>
  <li><strong>Bob Kalpon</strong> — <a href="https://www.youtube.com/watch?v=lpRgRDbhOPI">Finding bad / shorted SMD capacitors</a></li>
</ul>]]></content><author><name>minuitfranck</name></author><category term="Journal" /><category term="game-boy" /><summary type="html"><![CDATA[Power issues, lost grounds, ripped pads — and the references that got me unstuck.]]></summary></entry><entry><title type="html">Game Boy Light Color (LoCo) by NatalieTheNerd</title><link href="https://minuitfranck.com/build%20logs/2026/05/13/game-boy-light-color-loco.html" rel="alternate" type="text/html" title="Game Boy Light Color (LoCo) by NatalieTheNerd" /><published>2026-05-13T00:00:00+00:00</published><updated>2026-05-13T00:00:00+00:00</updated><id>https://minuitfranck.com/build%20logs/2026/05/13/game-boy-light-color-loco</id><content type="html" xml:base="https://minuitfranck.com/build%20logs/2026/05/13/game-boy-light-color-loco.html"><![CDATA[<p><img src="/assets/images/posts/game-boy-light-color-loco/3568d8d5-3e45-4b75-ab11-e727a01e560f.jpeg" alt="" /></p>

<p>My first PoCo was actually a <a href="https://nataliethenerd.com/products/light-colour-loco">LoCo</a>. My first dive into the world of pocket colors or modern gameboy colors was <a href="https://github.com/nataliethenerd">NatalieTheNerd</a>’s pre-built Gameboy Light Color board. I ordered this from her website and also one clear <a href="https://s.click.aliexpress.com/e/_on6Ffma">GBL shell</a> housing from AliExpress. I wanted my first entry into modding to be encouraged by a perfectly built device! I was eager and excited to be playing my favorite romhacks on this board built by one of the modding experts. Fitment, shell modification, and aesthetics, are important when putting these devices together, especially for transparent shells. Little did I know I was in for a world of fitment issues that led to this thing being put together much much later than expected.</p>

<p>First of all (as of Winter/Spring 2025), there are very limited, basically NO options for the Game Boy Light shells. There are literally only two colors, clear and white, and whoever manufactures them and packages them together with the screws and metal plate provided have probably never assembled a Game Boy Light motherboard into one for quality control. There are many issues with trying to get a Game Boy Light to fit into these aftermarket shells. And yes, I tried with an original Nintendo stock GBL as well, not just the LoCo. I only ordered one for my first attempt thinking it would be easy, and I failed spectacularly.</p>

<p><img src="/assets/images/posts/game-boy-light-color-loco/c06de29a-e363-4c31-9671-c5e878baae5c.jpeg" alt="" /></p>

<p>For my first clear shell, I ended up with a broken screw post from the back metal plate from excessive pressure from a poor fitting provided screw and a non-moving volume wheel due to the metal plate position/screw post. It ended up becoming my test shell for trimming and filing away enough space to fit <a href="https://s.click.aliexpress.com/e/_oDoE8XY">Q5 screens</a> and <a href="https://nataliethenerd.com/products/safer-charge-dc">USB-C mods</a>.</p>

<p><img src="/assets/images/posts/game-boy-light-color-loco/268338c3-ec5a-46fe-a509-e933a27fda87.jpeg" alt="" /></p>

<p>I learned quickly that making cuts in transparent shells leave very noticeable marks and laying down excessive masking tape is never a bad thing. I’ll end this with saying that I settled with an opaque white shell for my first LoCo.</p>

<p><img src="/assets/images/posts/game-boy-light-color-loco/e306d24e-e488-4bc3-bd86-621c27f4746f.jpeg" alt="" /></p>

<h3 id="fitment-notes-for-gbls">Fitment notes for GBLs</h3>

<ul>
  <li>
    <p>Q5 trimming— Very unfun thing to do. Bunch of YouTube videos for this. HandHeldLegend has a <a href="https://youtu.be/-zYm6f0DcM0?si=uCBngJRw52vsnjPd&amp;t=27">good one</a>. Tape everything, just do it.</p>
  </li>
  <li>
    <p>Volume wheel movement— Saw (or grind) down perpendicular metal edge of aftermarket cartridge shield if making a LoCo without a donor cartridge shield, maybe the top of the plastic screw post too. File down the sides of the shell for volume wheel opening as needed to allow the wheel to turn.</p>
  </li>
  <li>
    <p>USB-C Mods— depth for this front shell went the full distance of the DC jack, removed the small nub/lip on the back shell and minimal filing for the length of the port. Stop to measure fit lots of times!</p>
  </li>
  <li>
    <p>Power switch— file down both horizontal surfaces of the plastic moveable switch since the front/back shell enclosures have a very narrow space. Avoid filing too much as you want to have the tactile pressure of shifting the power switch on rather than a smooth slide. This is a common issue with other aftermarket shells too.</p>
  </li>
</ul>

<h3 id="the-build-materials">The Build Materials</h3>

<ul>
  <li>
    <p><a href="https://nataliethenerd.com/products/light-colour-loco">Light Color Board by NatalieTheNerd</a>, <a href="https://nataliethenerd.com/products/safer-charge-dc">Safer Charge DC Board</a></p>
  </li>
  <li><a href="https://s.click.aliexpress.com/e/_on6Ffma">Game Boy Light aftermarket shell</a></li>
  <li>
    <p><a href="https://s.click.aliexpress.com/e/_oC1aFoQ">GBP Buttons</a> “IPS Ready”, <a href="https://www.aliexpress.us/item/3256802705175758.html">GBP Buttons</a> Gamenaissance</p>
  </li>
  <li><a href="https://s.click.aliexpress.com/e/_oFlRSAe">103048 3.7v LiPo Battery</a></li>
</ul>]]></content><author><name>minuitfranck</name></author><category term="Build Logs" /><category term="game-boy" /><summary type="html"><![CDATA[My first Pocket Color mod: NatalieTheNerd's LoCo in a clear GBL shell.]]></summary></entry><entry><title type="html">Game Boy Light Refurbishment</title><link href="https://minuitfranck.com/build%20logs/2026/05/13/game-boy-light.html" rel="alternate" type="text/html" title="Game Boy Light Refurbishment" /><published>2026-05-13T00:00:00+00:00</published><updated>2026-05-13T00:00:00+00:00</updated><id>https://minuitfranck.com/build%20logs/2026/05/13/game-boy-light</id><content type="html" xml:base="https://minuitfranck.com/build%20logs/2026/05/13/game-boy-light.html"><![CDATA[<p><img src="/assets/images/posts/game-boy-light/a32eab52-185e-4e0b-a440-95d4fcb52bf4.jpeg" alt="" /></p>

<p>The Game Boy Light has always been a chase device of mine and many others. Its production was limited to only Japan and was within months of the release of the Game Boy Color. It features a cool electroluminescent screen and sold in lower quantities due to its limited domestic market sale and competition against the release of the GBC.</p>

<p>I was able to get three of these junk units and thankfully they all turned on and ran fine. There was some mild battery terminal corrosion that could be easily repaired with replacing with new terminals and opening them all up, the motherboards were more or less pristine. For the two units without screen issues they would do with a simple clean up and possible re-shell. Their contrast wheels had poor fidelity and either needed cleaning or replacing.</p>

<p>For the one with a burnt out screen, my options were to either try to refurbish with an as close to OEM stock screen to retain the original electroluminescent backlit screen or to do a full on upgrade to an IPS screen such as a Q5 IPS screen (same as those used in GBPs).</p>

<p>Compared to finding similar to OEM screen, it is almost easier to go all out an get a Q5 IPS screen to replace these burnt out screens and use a built in screen color filter to mimic to electroluminescent teal/blue backlighting or to use another add-on <a href="https://handheldlegend.com/products/game-boy-backlight-v3">Backlight Display Mod</a> such as one from Handheld Legend.</p>

<p>The reason for the difficulty in replacing these GBL screens is that in reading guides and forum threads, time after time, people will bring up the <a href="https://www.reddit.com/r/Gameboy/comments/18myle7/how_difficult_is_fixing_or_finding_a_replacement">difficulty</a> in how to use the appropriate polarizing filter. You may come across posts that refer to sourcing the film from Taiwan, or finding a specialist in Brazil that cuts these for the GBP and the WonderSwan, or a broken AliExpress link to a filter that apparently worked for them. There’s also YouTube videos that show the painful process. He literally says, “<a href="https://www.youtube.com/watch?v=qmBqdU8Q5Xc&amp;t=1798s">this is gonna suck, I hope I didn’t ruin this</a>,” a sentiment that I can relate to so many times in modding. He is successful at the end of the video, but I’m not this guy, and I’m not that good.</p>

<p>So of course, I didn’t hold my breath and I did order a <a href="https://s.click.aliexpress.com/e/_oDgXzNg">Q5</a>. But somehow right after that, I magically, in the rabbit holes of the internet, I did find someone that was selling a perfectly repaired GBL screen with replaced cable and polarizing film.</p>

<p>I began opening up the GBLs and wanted to create two replica Famitsu 500 Model F-02 units. One with the original electroluminescent screen with minimal refurbishment and another with modern upgrades—Laminated Q5, new speaker, capacitors, LED/resistor. Things were going great with the modern one until I put it together and put too much pressure onto one of the top screw posts and cracked the screen as the screw likely disrupted the lamination. The modern replica is just a display piece for now. But at least I have a refreshed original electroluminescent GBP screen. Something that a 12 year-old me would have loved playing Pokemon Blue on in dim lighting or at night in my bedroom with the lights off so my mom couldn’t tell I was playing games.</p>

<p><img src="/assets/images/posts/game-boy-light/28902482-2e08-4541-9e90-4ef3b04dd194.jpeg" alt="" /></p>

<p>…I guess this is still an ongoing project!</p>

<p>Resources and Links of Interest</p>

<ul>
  <li>@Sambalooby’s <a href="https://www.youtube.com/watch?v=xt1xQjnbrwQ">Building the famitsu 500 and how to spot fakes video</a></li>
</ul>]]></content><author><name>minuitfranck</name></author><category term="Build Logs" /><category term="game-boy" /><summary type="html"><![CDATA[Refurbishing three junk GBL units, plus the EL-vs-IPS screen call.]]></summary></entry><entry><title type="html">Game Boy Pocket Power (gbpp) by marshallh</title><link href="https://minuitfranck.com/build%20logs/2026/05/13/gbpp-by-marshallh.html" rel="alternate" type="text/html" title="Game Boy Pocket Power (gbpp) by marshallh" /><published>2026-05-13T00:00:00+00:00</published><updated>2026-05-13T00:00:00+00:00</updated><id>https://minuitfranck.com/build%20logs/2026/05/13/gbpp-by-marshallh</id><content type="html" xml:base="https://minuitfranck.com/build%20logs/2026/05/13/gbpp-by-marshallh.html"><![CDATA[<p><img src="/assets/images/posts/gbpp-by-marshallh/pV4FjxV.jpeg" alt="" /></p>

<p>Progressing further with hotplate and hot air soldering, I decided to try my hand at the <a href="https://github.com/marshallh/gbpp/blob/main/README.md">gbpp</a> which was developed by <a href="https://github.com/marshallh">marshallh</a>. This power board is both a 5V regulator and also allows for play&amp;charge with a lipo cell. I prefer the aesthetic of this power board as it still retains the look of a typical original power regulator as there are components on the front face of the main board. This board is a little more advanced to solder as it requires soldering on two QFN chips and more capacitors.</p>

<p><img src="/assets/images/posts/gbpp-by-marshallh/WcX9YPu.png" alt="" /></p>

<p>I had a bit of trouble soldering these at first since there were more tiny components to keep track of. Eventually I managed to finish a batch that I was proud of, but I did have a huge rookie moment in which I tested the board from the wrong side and so I kept touching up the board to “fix” it, thinking I had soldered something on incorrectly. Reading the voltage at “PIN 7” (which was actually PIN 1) with the board flipped will show a value sub-1V. Flipping it over to the right side and placing the power supply on the correct PIN 1/3 and probes I got it to measure 5V at PIN7.</p>

<p><img src="/assets/images/posts/gbpp-by-marshallh/7L54u8H.jpeg" alt="" /></p>

<p><img src="/assets/images/posts/gbpp-by-marshallh/bfLwTlh.jpeg" alt="" /></p>

<p>Next up was wiring up a lipo cell and testing the charge function.
CHG5V: wire to 5V USB-C source using a breakout board by mahko
VBAT+: Lipo battery positive terminal on main board
VBAT-: Lipo battery negative terminal on main board
SYS: to the power input, fuse near headphone jack on the main board. It should be the same net as the pocket’s battery pos terminal
*Note that this board does not provide intrinsic lipo protection. However, almost all cells available already have a BMS board pre-installed.</p>

<p>Checking for the charging LED to be ON when plugged in to charge the lipo cell and OFF when charging has completed.</p>

<h3 id="the-build-materials">The Build Materials</h3>

<ul>
  <li>
    <p><a href="https://github.com/marshallh/gbpp">PCB</a> ordered from a fabricator– I used <a href="https://jlcpcb.com/?from=AELLF">JLCPCB</a></p>
  </li>
  <li>
    <p><a href="https://github.com/marshallh/gbpp/blob/main/bom.xlsx">Bill of Materials</a>- Recommend purchasing through Mouser or DigiKey. I also have an edited <a href="/assets/images/posts/gbpp-by-marshallh/GBPP-001_BOM_handsolder.xlsx">BOM</a> that includes additional component info that I used.</p>
  </li>
  <li>
    <p><a href="https://github.com/makhowastaken/Pocket-Color-Type-C">Pocket Color Type C</a> - USB-C breakout board by <a href="https://github.com/makhowastaken/">Mahko</a></p>
  </li>
  <li>
    <p><a href="https://s.click.aliexpress.com/e/_c3a3dEGj">102045 LiPo battery</a></p>
  </li>
</ul>]]></content><author><name>minuitfranck</name></author><category term="Build Logs" /><category term="game-boy" /><summary type="html"><![CDATA[Hot-plate soldering marshallh's gbpp — 5V regulator with play-and-charge.]]></summary></entry><entry><title type="html">Laminated AMOLED Screen Kit from HISPEEDIDO</title><link href="https://minuitfranck.com/build%20logs/2026/05/13/laminated-amoled-screen-kit.html" rel="alternate" type="text/html" title="Laminated AMOLED Screen Kit from HISPEEDIDO" /><published>2026-05-13T00:00:00+00:00</published><updated>2026-05-13T00:00:00+00:00</updated><id>https://minuitfranck.com/build%20logs/2026/05/13/laminated-amoled-screen-kit</id><content type="html" xml:base="https://minuitfranck.com/build%20logs/2026/05/13/laminated-amoled-screen-kit.html"><![CDATA[<p>And so began my journey into modding. I have to say, for a first mod, this was one of the softest landings into the modding world—and one of the highest-value returns. It was the first kit I ever purchased, and it required an extremely minimal amount of soldering. Literally one ball of solder to attach a single pre-attached wire from the pre-mounted PCB on the pre-laminated AMOLED screen. After watching a couple of YouTube videos, I decided it was now or never. Watching those videos encouraged me to look into soldering and purchasing equipment. After some practice, I picked up a soldering iron and committed to getting the job done for this gorgeous screen.</p>

<p>The GBC I used was a well loved original Atomic Purple one I found in a storage bin at home. It had no corrosion, but it wouldn’t power on. After some quick research, I discovered the most common issue: a dirty power switch. A bit of isopropyl alcohol and some careful scrubbing with a Q-tip around the switch and the Game Boy powered on with the screen working but it had no sound. I also immediately found myself wondering… how did we ever play for so many hours on such a dim screen?</p>

<p>After receiving the mod kit, soldering tools, and a few practice kits, I took some time to get familiar with soldering even though it was just a few points for the speakers and the screen. It took a little while to get the feel for positioning the tip correctly, understanding how to heat both surfaces evenly, and learning how to feed the solder, and hold the iron long enough to avoid a cold joint. Once I completed the mod, the results were jaw-dropping for my first mod.</p>

<p><img src="/assets/images/posts/laminated-amoled-screen-kit/89c84bbf-0d16-4554-b8d8-30481e27a482.jpeg" alt="" /></p>

<p>Unfortunately, the transparent shell quality from HISPEEDIDO is not great and like many others mine began to crack. I will have to at some point remove the screen and place it into a new shell. It has been recommended to use other pre-laminated shells that are opaque or translucent and IPS ready such as <a href="https://funnyplaying.com/products/cgb-retro-pixel-laminated-coustom-shell">FunnyPlaying</a>. Some other caveats for purchasing this AMOLED kit would be to avoid any resellers that have this kit for ridiculously low prices. I noticed a lot of fake “local/US” resellers listing these for around $30 while the normal kit sells closer to $50 and ships from China.</p>

<h3 id="the-build-materials">The Build Materials</h3>

<ul>
  <li><a href="https://s.click.aliexpress.com/e/_ooob3ae">HISPEEDIDO AMOLED Touchscreen Kit</a></li>
  <li><a href="https://s.click.aliexpress.com/e/_oo056Bc">DigitalDanceHall High Quality Speaker GBC</a></li>
</ul>

<p>Other Shells that I’ve seen recommended (I have not used):</p>

<ul>
  <li><a href="https://funnyplaying.com/products/cgb-retro-pixel-laminated-coustom-shell">FunnyPlaying GBC IPS ready shell</a></li>
  <li><a href="https://s.click.aliexpress.com/e/_ok5obg6">GBC IPS ready shell</a>, <a href="https://s.click.aliexpress.com/e/_oBLdlVU">Special printed IPS shell</a></li>
</ul>]]></content><author><name>minuitfranck</name></author><category term="Build Logs" /><category term="game-boy" /><summary type="html"><![CDATA[A laminated AMOLED kit: one solder ball, huge upgrade.]]></summary></entry><entry><title type="html">Model Size Comparisons: Pocket, Light, Color</title><link href="https://minuitfranck.com/resources/2026/05/13/model-comparisons.html" rel="alternate" type="text/html" title="Model Size Comparisons: Pocket, Light, Color" /><published>2026-05-13T00:00:00+00:00</published><updated>2026-05-13T00:00:00+00:00</updated><id>https://minuitfranck.com/resources/2026/05/13/model-comparisons</id><content type="html" xml:base="https://minuitfranck.com/resources/2026/05/13/model-comparisons.html"><![CDATA[<p><img src="/assets/images/posts/model-comparisons/gI3dh5s.jpeg" alt="" /></p>

<table>
  <thead>
    <tr>
      <th> </th>
      <th>Pocket</th>
      <th>Light</th>
      <th>Color</th>
    </tr>
  </thead>
  <tbody>
    <tr>
      <td><strong>Size</strong></td>
      <td>H: 127.6 mm (5.02 in)<br />W: 77.6 mm (3.06 in)<br />D: 25.3 mm (1.00 in)</td>
      <td>H: 135 mm (5.31 in)<br />W: 80 mm (3.15 in)<br />D: 29 mm (1.14 in)</td>
      <td>H: 133.5 mm (5.26 in)<br />W: 78 mm (3.07 in)<br />D: 27.4 mm (1.08 in)</td>
    </tr>
    <tr>
      <td><strong>Weight</strong></td>
      <td>125 g (4.4 oz)</td>
      <td>154 g (5.4 oz)</td>
      <td>136 g (4.8 oz)</td>
    </tr>
    <tr>
      <td><strong>Power-source batteries</strong></td>
      <td>2× AAA</td>
      <td>2× AA</td>
      <td>2× AA</td>
    </tr>
    <tr>
      <td><strong>Lithium battery number</strong></td>
      <td>102045</td>
      <td>103048</td>
      <td>103048</td>
    </tr>
    <tr>
      <td><strong>Pack capacity</strong></td>
      <td>500–1000 mAh</td>
      <td>1400–1500 mAh</td>
      <td>1400–1500 mAh</td>
    </tr>
    <tr>
      <td><strong>Available kits</strong></td>
      <td><a href="https://s.click.aliexpress.com/e/_c42NSPpD">700 mAh AliEx USB-C</a></td>
      <td>Custom only</td>
      <td><a href="https://s.click.aliexpress.com/e/_c35wr6yF">1800 mAh AliEx with optional wireless</a><br /><a href="https://s.click.aliexpress.com/e/_c43SEldt">1800 mAh AliEx DC jack</a><br /><a href="https://funnyplaying.com/products/gbc-battery-charging-mod">1800 mAh FP DC jack</a></td>
    </tr>
    <tr>
      <td><strong>Screens</strong></td>
      <td><a href="https://s.click.aliexpress.com/e/_c4bFLwhz">2.8” IPS HISPEEDIDO</a><br /><a href="https://s.click.aliexpress.com/e/_c2z456Jh">Q5 Non-Laminated HISPEEDIDO</a></td>
      <td>No kits available<br />GBL lens with 2.6” Non-Laminated screen<br /><a href="https://s.click.aliexpress.com/e/_c3e1CQ6f">2.6” Non-Laminated IPS CGS</a></td>
      <td><a href="https://s.click.aliexpress.com/e/_c4bFLwhz">2.8” IPS HISPEEDIDO</a><br /><a href="https://s.click.aliexpress.com/e/_c3s6HTx5">2.78” Transreflective CGS</a><br /><a href="https://s.click.aliexpress.com/e/_c3I3Ha4x">AMOLED HISPEEDIDO</a><br /><a href="https://s.click.aliexpress.com/e/_c42bY3PV">Q5 Laminated HISPEEDIDO</a><br /><a href="https://s.click.aliexpress.com/e/_c2z456Jh">Q5 Non-Laminated HISPEEDIDO</a><br /><a href="https://s.click.aliexpress.com/e/_c3IHfF4B">2.6” Laminated IPS CGS</a><br /><a href="https://s.click.aliexpress.com/e/_c3e1CQ6f">2.6” Non-Laminated IPS CGS</a></td>
    </tr>
  </tbody>
</table>

<p><img src="/assets/images/posts/model-comparisons/L6vuIZc.jpeg" alt="" /></p>

<p><img src="/assets/images/posts/model-comparisons/zjzthIt.jpeg" alt="" /></p>]]></content><author><name>minuitfranck</name></author><category term="Resources" /><category term="game-boy" /><summary type="html"><![CDATA[Side-by-side specs for the Game Boy Pocket, Light, and Color.]]></summary></entry><entry><title type="html">My Favorite GBC Pokemon ROM Hacks (as of May 2026)</title><link href="https://minuitfranck.com/resources/2026/05/13/my-favorite-pokemon-rom-hacks-as-of-may-2026.html" rel="alternate" type="text/html" title="My Favorite GBC Pokemon ROM Hacks (as of May 2026)" /><published>2026-05-13T00:00:00+00:00</published><updated>2026-05-13T00:00:00+00:00</updated><id>https://minuitfranck.com/resources/2026/05/13/my-favorite-pokemon-rom-hacks-as-of-may-2026</id><content type="html" xml:base="https://minuitfranck.com/resources/2026/05/13/my-favorite-pokemon-rom-hacks-as-of-may-2026.html"><![CDATA[<p>I still remember the first time I booted up my copy of Pokémon Blue back in 1998. Eager to find out what all my friends were so addicted to, I switched on my Game Boy and stepped into that tiny, dim pixelated world — and felt something completely new open up in front of me.</p>

<p>Gen 1 and Gen 2 shaped the way I see the Pokémon world, and honestly, no other era has ever quite matched that feeling. So when I discovered the ROM hacking community, I was both impressed and grateful to find such a passionate group of people chasing exactly the same thing I was: that same magic, but with modern polish, new stories, and all the quality-of-life improvements that make revisiting those classics feel fresh rather than frustrating.</p>

<p>These four ROM hacks are my current personal favorites — each one rooted in the GBC era I grew up loving, but reimagined in ways that make them feel like the games I always wished existed.</p>

<h3 id="1-pokémon-coral-version-12-demo-2022">1. <a href="https://www.pokecommunity.com/threads/pok%C3%A9mon-coral-version-2022-demo-out-now.402361/">Pokémon Coral, Version 1.2 Demo (2022)</a></h3>

<p>by <a href="https://x.com/coraldev_">CoralDev</a> — <a href="https://github.com/pkmncoraldev">GitHub</a> · <a href="https://ko-fi.com/coraldev">Ko-fi</a> · <a href="https://www.pokecommunity.com/threads/2018-results.418448/">2nd Place Hack of the Year 2018</a></p>

<div class="mf-image-row">
  <img src="https://storage.ko-fi.com/cdn/useruploads/display/4dbf539d-cb36-42b2-86eb-09941454214e_pokemoncoralversion2022demov1.2-0.png" alt="" />
  <img src="https://storage.ko-fi.com/cdn/useruploads/display/a3cc2709-4637-47a4-9636-2d463e98a58d_118706-1.jpg" alt="" />
  <img src="https://storage.ko-fi.com/cdn/useruploads/display/1cb870ad-9674-43fd-91e2-e4b4de02aaa3_pokemoncoralversion2022demov1.2-1.png" alt="" />
</div>

<p>A Crystal-based Gen 2 hack set in the brand-new Onwa Region, built to recapture the feeling of playing Gold, Silver, and Crystal for the first time. It features an entirely original story, a new soundtrack, Pokémon from all seven generations with custom art, six starters to choose from (all from Gens 1–2), and modern quality-of-life improvements like abilities, the Physical/Special split, and HM-free overworld travel. Still in demo form, but well worth checking out.</p>

<p>This is easily my top favorite — it has gorgeous maps and charming gameplay. It captures the nostalgic feeling of playing the original games but with a completely new story. The current demo plays up to the 4th gym and some post-game extras. CoralDev is working on the final version that will have 8 gyms.</p>

<h3 id="2-pokémon-orange-suloku-patch-2026">2. <a href="https://www.pokecommunity.com/threads/hack-of-the-year-2017-pok%C3%A9mon-orange-gbc-suloku-patch-2026.387653/">Pokémon Orange, Suloku Patch (2026)</a></h3>

<p>by <a href="https://x.com/romhackingcarr1">PiaCRT</a> — <a href="https://github.com/PiaCarrot/pokeorange">GitHub</a> · <a href="https://discord.gg/cdrH3qBJnn">Discord</a> · <a href="https://www.pokecommunity.com/threads/results-2017.406141/">1st Place in Hack of the Year 2017</a></p>

<div class="mf-image-row">
  <img src="https://storage.ko-fi.com/cdn/useruploads/display/0d1bee60-84d3-4ef1-8071-8f61689081a0_pokemonorange-3.png" alt="" />
  <img src="https://storage.ko-fi.com/cdn/useruploads/display/c6a5b0ec-0c35-41f4-a1c7-d36bc65d98c2_screenshot2026-04-20213035.png" alt="" />
  <img src="https://storage.ko-fi.com/cdn/useruploads/display/1d4289ca-e24d-40e8-bfe0-8cd090b06e72_pokemonorange-1.png" alt="" />
</div>

<p>A Crystal-based Gen 2 hack that transforms the game into an adaptation of the Orange Islands arc from the Pokémon anime. You play as a kid from Valencia Island tasked with delivering the mysterious GS Ball to Samson Oak while taking on the Orange Crew through 4 gyms. It features a mostly original soundtrack that sounds authentically like Pokémon music.</p>

<p>Similar to Coral, Orange does an excellent job of keeping the same cozy “feel” of the original games while providing a completely new storyline that immediately takes you surfing between islands in the Orange Islands region. Along with the typical slew of QOL additions, you have the option of patching with PSS or no-PSS as well.</p>

<p>The current (original) version of this ROM hack is considered complete up to the champion, while a full remake called <a href="https://www.pokecommunity.com/threads/pok%C3%A9mon-orange-island-walker.496209/">Island Walker</a> is currently in development with a new code base.</p>

<h3 id="3-pokémon-crystal-clear-2026">3. <a href="https://shockslayer.com/crystal-clear/">Pokémon Crystal Clear (2026)</a></h3>

<p>by <a href="https://shockslayer.com/about/">ShockSlayer</a> — <a href="https://ko-fi.com/shockslayer">Ko-fi</a> · <a href="https://discord.gg/tskaCr2">Discord</a></p>

<div class="mf-image-row">
  <img src="https://storage.ko-fi.com/cdn/useruploads/display/7a23d515-faba-4ae9-8dcc-b3dcdfe8b307_pokemon-crystalcleargoomba-7.png" alt="" />
  <img src="https://storage.ko-fi.com/cdn/useruploads/display/f47e1727-a013-47b9-be89-1343e7f987dd_screenshot2026-04-20214737.png" alt="" />
  <img src="https://storage.ko-fi.com/cdn/useruploads/display/49fef8fc-70f4-450f-bac5-757c92ae60de_pokemon-crystalcleargoomba-9.png" alt="" />
</div>

<p>A Crystal-based hack that transforms Johto and Kanto into a fully open-world experience, letting players freely explore both regions from the very start without needing to beat the Elite Four first. You can pick from 24 starters, customize your character, collect all 16 badges, and challenge a new Elite Four, with gym leaders and trainers that scale to your badge count. One of the most beloved and frequently updated Gen 2 hacks around.</p>

<p>Crystal Clear is an immediate pick-up-and-play ROM hack. With no forced storyline to push through, you’re free to just explore, collect, and battle entirely on your own terms.</p>

<h3 id="4-pokémon-red-v3-2018">4. <a href="https://www.reddit.com/r/PokemonROMhacks/comments/a76sbz/red_v302_release/">Pokémon Red++ v3 (2018)</a></h3>

<p>by <a href="https://www.reddit.com/user/JustRegularLuna/">JustRegularLuna</a> — <a href="https://github.com/JustRegularLuna/rpp-backup">GitHub</a></p>

<div class="mf-image-row">
  <img src="https://storage.ko-fi.com/cdn/useruploads/display/822ec10e-040f-4b6b-a70d-73bd802de0ac_pokemonredplusplus-3.png" alt="" />
  <img src="https://storage.ko-fi.com/cdn/useruploads/display/77f1e87a-4bdc-4b72-bbf4-0db756107550_pokemonredplusplus-4.png" alt="" />
  <img src="https://storage.ko-fi.com/cdn/useruploads/display/84fc0350-b3cb-4c84-a418-b7dbf86cee62_pokemonredplusplus-5.png" alt="" />
</div>

<p>There’s nothing more nostalgic than just replaying the first Pokémon game on Game Boy. Red++ is a hack of Pokémon Red intended as both a standalone game and a rombase, modernizing the Gen 1 experience by fixing its most glaring bugs and adding features fans have grown accustomed to. This includes full color, PSS, updated type charts (Dark, Steel, and Fairy), later-generation evolutions, unlimited TMs, and a variety of QOL improvements — all while keeping the original Kanto story intact. A Hard Mode version is also available for those wanting a tougher challenge.</p>

<p>Red++ v4 was planned to be based off a new <a href="https://github.com/rangi42/polishedcrystal">Polished Crystal</a> (by <a href="https://github.com/Rangi42">Rangi42</a>) engine, but it has been put <a href="https://github.com/JustRegularLuna/RedPlusPlus">on hold</a>.</p>]]></content><author><name>minuitfranck</name></author><category term="Resources" /><category term="game-boy" /><summary type="html"><![CDATA[Four GBC-era Pokémon ROM hacks that scratch the Gen 1/2 itch with modern polish.]]></summary></entry><entry><title type="html">Physical Cartridges for GB/GBC</title><link href="https://minuitfranck.com/resources/2026/05/13/physical-cartridges-for-gb-gbc.html" rel="alternate" type="text/html" title="Physical Cartridges for GB/GBC" /><published>2026-05-13T00:00:00+00:00</published><updated>2026-05-13T00:00:00+00:00</updated><id>https://minuitfranck.com/resources/2026/05/13/physical-cartridges-for-gb-gbc</id><content type="html" xml:base="https://minuitfranck.com/resources/2026/05/13/physical-cartridges-for-gb-gbc.html"><![CDATA[<p><img src="/assets/images/posts/physical-cartridges-for-gb-gbc/8f0e90b1-41cc-4753-b955-54fe01e7abc1_img_8080large2.jpeg" alt="" /></p>

<p>There are multiple ways to play games on a physical Game Boy or Game Boy Color. This basic guide covers the pros and cons of each method to help you decide which option works best for your needs and budget.</p>

<p><strong>1. Official Cartridges</strong></p>

<p>Prices are steep due to collector demand. Japanese cartridges offer a more affordable alternative and there are a few that are playable without Japanese literacy—especially puzzle games, platformers, and recognizable titles like Mario, Kirby, and Tetris.</p>

<p><strong>2. Reproduction Carts</strong></p>

<p>Cost: $5–10 each
Pros: Affordable, readily available all over AliExpress, <a href="https://s.click.aliexpress.com/e/_c3dbqrj9">example</a>
Cons: Quality is inconsistent; save file corruption is common. Always read seller and product reviews before purchasing. Some of these reproduction carts can be rewritten with a burner device as well (see below).</p>

<p><strong>3. Rewriteable Flashcarts with Burner Device</strong></p>

<p>Cost: ~$30-35 per rewriteable cart + $30 burner device such as <a href="https://s.click.aliexpress.com/e/_c3jnay3v">GBXFlash</a></p>

<p>How it works: The burner device connects to your computer via USB, allowing you to flash different games onto the same rewriteable cart. Rewriteable carts come in many varieties. I highly recommend ChisFlash family of carts (<a href="https://s.click.aliexpress.com/e/_c4lunuD9">MBC5 cart</a>, or <a href="https://s.click.aliexpress.com/e/_c4p6iJd1">one with RTC</a>) as they tend to be more affordable. Save files can be managed and backed up on your PC. Having a burner device allows you to also dump official cartridges and store/manage save files on a computer. This option also opens up the ability for ROM patching for translated games and romhacks.</p>

<p><strong>4. microSD-Based Flashcart</strong>
How it works: Load ROMs onto a microSD card, insert the card into the flashcart, and play. No computer required after initial setup. Similar to option 3, you can manage save files and patch ROMs.</p>

<p>Quality tiers:</p>

<p>Budget knock-offs</p>

<ul>
  <li>“<a href="https://s.click.aliexpress.com/e/_c3ddeXUf">OSV4</a>”/<a href="https://s.click.aliexpress.com/e/_c4mZ7Y2n">Game Boy GB Pro</a> and other clones found all over AliExpress, $20-30 + microSD card cost (higher compatibility issues, faster battery drain)</li>
</ul>

<p>Mid-tier</p>

<ul>
  <li><a href="https://www.ezflash.cn/product/ezflash-junior/">EZ-Flash Jr.</a> $60: (fewer compatibility issues, moderate battery drain, real-time clock (RTC) for day/night games like Pokémon Crystal</li>
  <li><a href="https://krikzz.com/our-products/cartridges/everdrive-gb-x5.html">Everdrive GB-X5</a> $60: zero compatibility issues, low battery drain, but no RTC</li>
</ul>

<p>Premium</p>

<ul>
  <li><a href="https://krikzz.com/our-products/cartridges/edgbx7.html">Everdrive GB-X7</a> $135: zero compatibility issues, RTC support, save states</li>
</ul>

<p>Bonus feature of the above microSD flashcarts include a reboot button on the cartridge, eliminating the need to physically power off your Game Boy to reset the system. The Everdrive GB-X7 also adds a single save/load state slot that activates via the same button, making it easy to soft reset for specific in-game events—extremely useful for activities like hunting for Pokémon with specific stats or nature.</p>

<p><strong>Power Consumption:</strong> Options 1–3 are significantly more power-efficient and won’t impact your Game Boy’s battery life noticeably. Option 4 consumes more device battery and, particularly with cheaper models, may require periodic button battery replacements in the cartridge itself.</p>

<p><strong>My Recommendation:</strong></p>

<ul>
  <li>Best overall: GB-X7 flashcart (#4) at $135—handles all games flawlessly and includes RTC support plus the save/load state feature, allows you to manage save files, and patch ROMs with translations/romhacks.</li>
  <li>Best value: Rewriteable flashcart + burner (#3) at ~$60—excellent performance with room to expand later by purchasing additional rewriteable carts. Allows save file management and ROM patching.</li>
</ul>]]></content><author><name>minuitfranck</name></author><category term="Resources" /><category term="game-boy" /><summary type="html"><![CDATA[Sourcing physical cartridges for original Game Boy and Game Boy Color hardware.]]></summary></entry></feed>